Can't be bothered to read this? Watch the video:
Whilst this written guide will take you through the complete proccess of creatign an animated golf logo, some things are hard to explain through words so if yo uget stuck, then simply follow my video guide! If you aren’t familiar with Adobe After Effects then I would also advise you to watc hthe video as this makes it easier to follow.
Do I need an animated golf intro?
The short answer is No.
But will your video look way better with one?
Definitely.
Adding quality graphcis to your videos it instantly lets the viewer “feel” better towards your video. In this current age of content creation it’s really important that your content looks good so viewers can instantly feel comfortable watching it. There are all sorts of ways to improve the quality of your golf videos but adding high quality graphics is an important one that will easily imporve your golf content.

What is an animated golf logo?
This is a follow along guide to animating your logo into a short graphic that you can use at the begining of your golf videos on YouTube or other social media. If you haven’t got a logo, then check out my last article on How To Create a Golf Logo where I discussed how to create a logo yourself, the the thought process behind it and some useful resources for making your own golf logo.
So as with all of my videos, this will be using Adobe Creative Suite. If you are really serious about creating content for your golf channel or your golf business, then I really recommend investing in Adobe’s Creative Suite. For animating your golf logo we will be using Adobe After Effects and Adobe Illustrator.
This tutorial will work with any logo so let’s get started!
Step 1 - Preparing your golf logo for animation
The first thing to do is to open up your logo into Adobe Illustrator. Ideally you will have this in a vector format such as .ai or .pdf. If you have this you can create seperate layers for each part you want to animate. If you only have the .png or .jpeg version of your logo then don’t worry, you can still animate with this. For now just skip to the next step.
When in Illustrator make sure you split every part of your logo into seperate layers and not just sub-layers (see screenshot below)
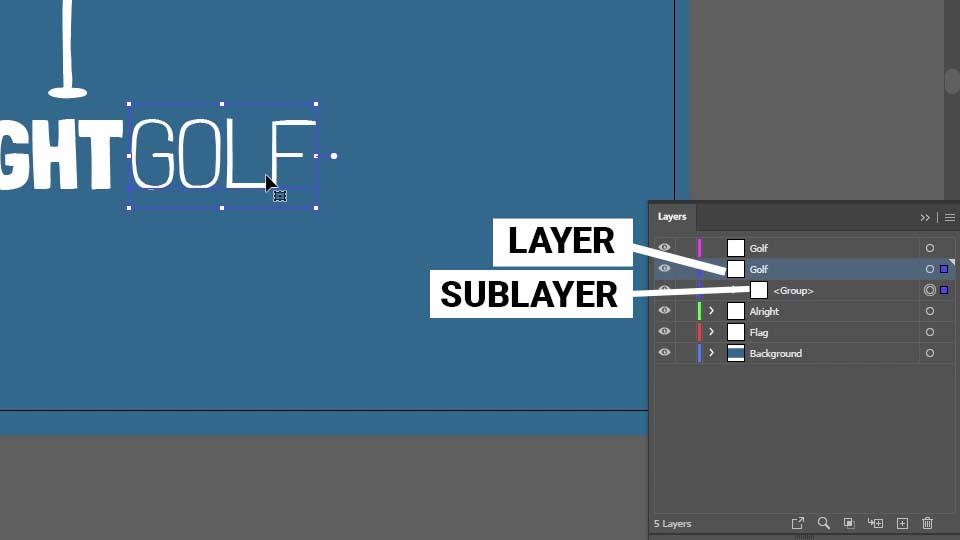
To do this press the three lines in the top right corner of the Layers window and select new layer. Then copy and Ctrl+Shift+Paste into the new layer.
Once your logo is prepared simply save it and open up Adobe After Effects
Step 2 - Importing your logo into adobe after effects
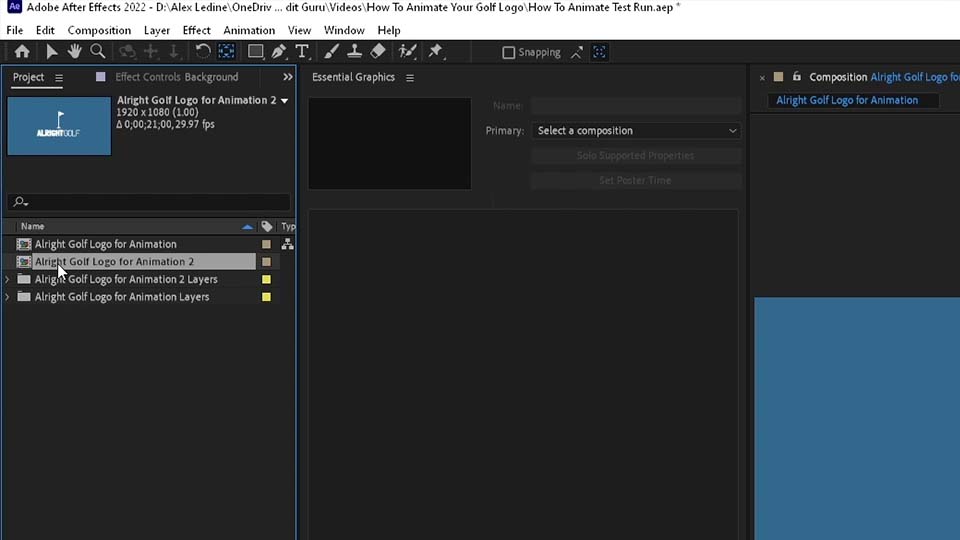
Before we can start animating we need to import your logo into Adobe After Effects. To do this simple click File>Import>Import File select your logo file, you will then get a popup and you should select Composition as the Import Kind.
Once this has been done you should see a composition created with the same name as your logo file. Double click this to open it and get started.
Step 3 - Keyframing the scale
The first thing we will be doing for our animation is make all of the emelents “pop” into the screen. To do this we will be using what are called keyframes for each element we want to animate. This is really simple and all we are doing is telling After Effects that we want our elements to start at 0% scale and then increase to 100%.
So to get started we will press the small “>” symbol of the layer we want to animate, this will then give us options for things we can keyframe. For this tutorial we are going to be using the scale but feel free to use this same proccess for any of the other properties of your layer. The next thing to do is press the stopwatch symbol to the left of the word “Scale” this will then add a diamond shape on your time line. This is telling After effects to display your layer at 100% sale at this point on the time line. You can then move this to any point on your timeline. For this tutorial just clicck and drag the keyframe to around the half second mark. After we have done that, drag the playhead (not the keyframe) back to the beginning of the timeline. Now change the value of the scale from 100 to 0. This will then create another keyframe telling After Effects to display your layer at 0% scale.
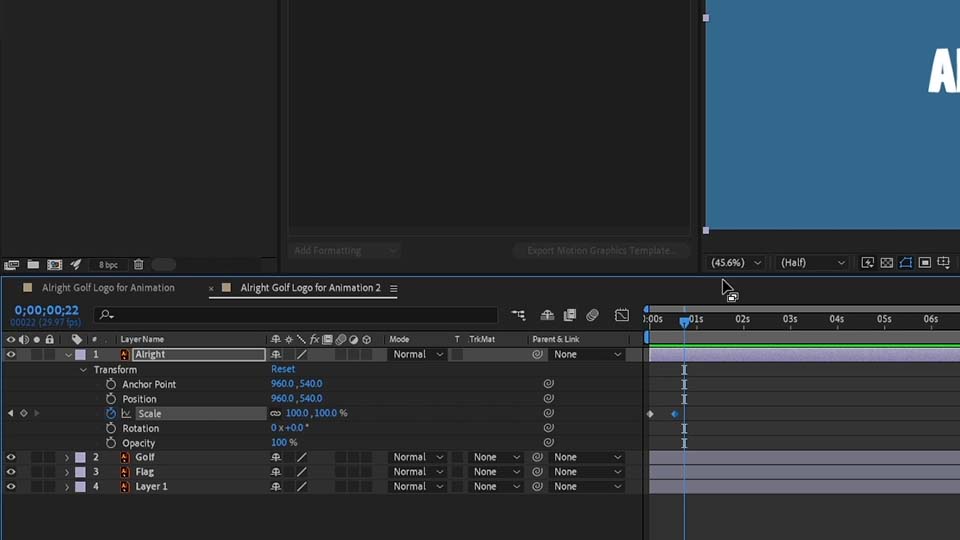
We can now press the slacebar to play through our animation and see it “pop” in. We have a problem though. Well two problems:
1. The logo appeares from the centre of the screen which looks strange.
2. The animation is quite monospeed and boring.
Lets fix problem number 1 first.
Step 4 - Changing the anchor point
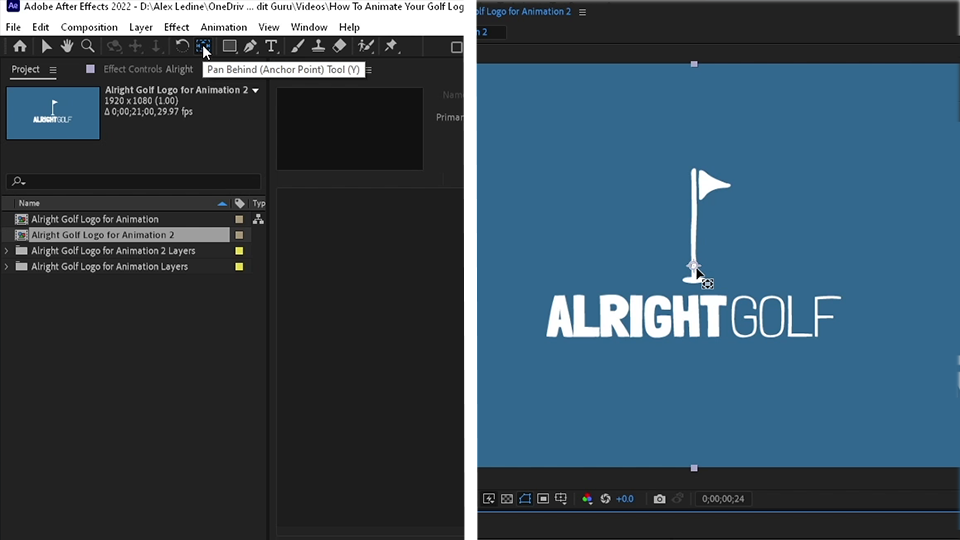
This is an easy fix. All we have to do is select the pan behind tool in the upper toolbar and select our layer. We then want to move the “sniper scope” from the centre of the screen to the centre of your layer (or wherever you want it to animate from). If you want this to be in the exact centre of the layer you can use the control key.
Done.
Step 5 - Making the animation more interesting
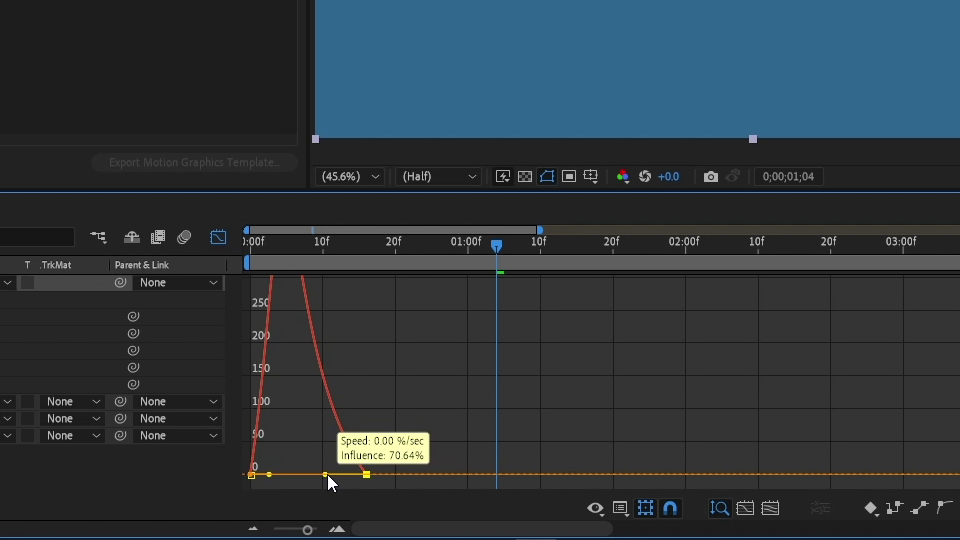
To make the animation more interesting we want to vary the speed. This is done through something called “easy ease”. Simply highlight the keyframes we just created by clicking and draging over them. Then right click one and select Keyframe Assistant > Easy Ease (A shortcut for this is F9). this will change the diamond shapes to a hourglass shape. This will then make the animation more interesting with the speed of it starting slowly before getting faster and then slowing down before it finishes. If you want to go one step further you can select the graph editor with both keyframes highlighted in blue. In the graph editor we can click the right point of the humped graph to reveal a handle. This can then be dragged tothe left to create an aysmetric hump like in the screenshot below:
Step 6 - Repeating everything
If you are working with a .jpg or .png logo and only have one layer then you are done here and can skip to the next step! If you have muliple layers then all we need to do now is repeat this for each layer and we have the first half of our animation completed. The next parts of the animation are going to be much the same as the first part but we are going to be changing the position and rotation of the layers instead of the scale. First thing to do is to moe the playback head to further in the timeline depending on when you want the golf logo animation to start to finish, thenhit hte stopwatch icon next to position and rotation (just like we did with scale). This will add position and rotation keyframes for your layer. Then move the player head on a little and adjust the rotation to around 45 (you can change this to your own taste) and you will need to adjsut the second number inthe position property until your layer disappears from your screen. Once done simply highlight and easy ease the mlike we did with the scale property.
Now repeat this proccess for all layers you want to animate and we can also animate the background layer to drop off the same way we did with the position keyframes of the layers.
Step 7 - Add motion blur
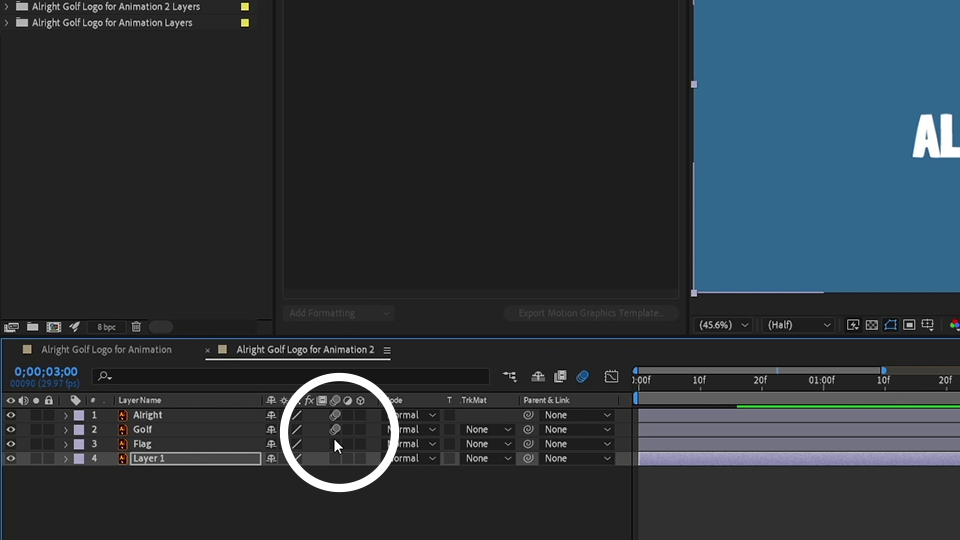
The last and easiest step is to add some motion blur. Alld we have to do is check the box under the motion blur icon:
And we’re done!
OK, so I hope that guide helped. If you want something a little bit more unique and feel free to experiment and we will slowly be delving more into After Effects in future articles. So stay tuned for those or subscribe to the YouTube channel for video guides.
As always, if you need any more help, you can send me a message on Instagram or through this website.
So in the next guide, we’ll be creating a lower third graphic, which you can use to introduce yourself at the beginning of your videos.
See you later!